HTML forms can be great additions to your WordPress website. They let visitors reach out to you, sign up for newsletters, provide feedback, and much more.
While HTML forms help you connect better with your audience, creating them can be tricky. And, if you are not familiar with coding, then the thought of dealing with code can be overwhelming.
In this guide, we will show you how to add HTML forms to your WordPress site. This will give you the tools you need to easily create custom HTML forms and make your website more engaging.
What Are HTML Forms and Why Create One?
HTML forms work much like other website forms. They let visitors type in and submit information like names, email addresses, feedback, orders, and more.
What sets them apart is that HTML forms are created using HTML code instead of a drag-and-drop visual editor like a form plugin. So, you will need to define fields such as text boxes, checkboxes, radio buttons, and dropdown menus yourself. You decide how they look and set specific rules for how they work.
Here are some advantages of making forms from scratch using HTML:
- Optimized Performance. HTML forms tend to load faster and use less memory because the code is lightweight.
- Control. You’ll have complete control over the form’s design and functionality because you’re not limited by a form builder’s features.
- Customization. HTML forms can be tailored exactly to your needs, offering more flexible form customization.
While creating HTML forms from scratch is a great way to learn and practice coding, it does have its own challenges.
You might have trouble with cross-browser compatibility, where the form works differently on different web browsers. Also, handling form validation with JavaScript can be tricky. It needs thorough testing to ensure you can collect and process all user inputs correctly.
That said, there are ways to add HTML forms without these complexities. So, no matter if you are managing a WordPress blog, business site, or online store, you can easily add HTML forms to your site without having to code from scratch.
In the following sections, we will show you how to add HTML forms to WordPress. Here’s a quick overview of the 2 methods we will cover in this guide:
Ready? Let’s get started.
Method 1: Adding HTML Forms in WordPress Using the HTML Forms Plugin (Easy)
An easy way to add an HTML form to a WordPress website is to use a free form plugin like HTML Forms. It’s a great tool for creating and configuring HTML forms all in one place, so you don’t have to deal with any server-side configuration.
In this guide, we will use the plugin’s free version, which includes everything you need to create an HTML form.
To get started, let’s make sure you have the plugin installed on your WordPress website. If you need help, then you can follow our step-by-step guide on installing a WordPress plugin.
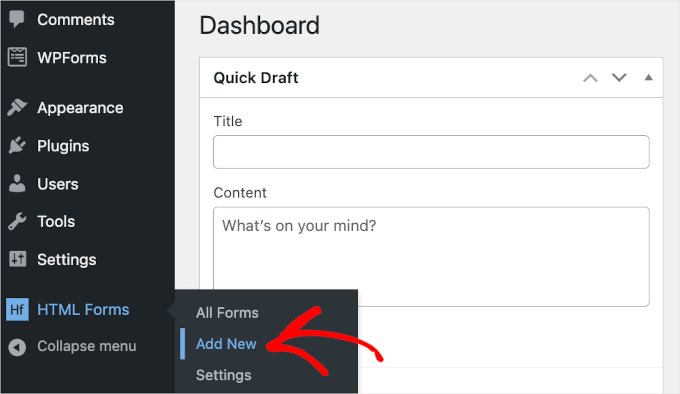
Upon activation, you can navigate to HTML Forms » Add New in your WordPress admin dashboard to start creating your contact form.

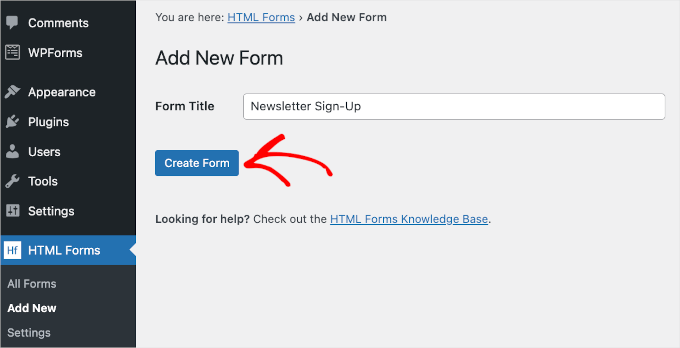
This will redirect you to the ‘Add New Form’ page.
From here, the first thing you’ll need to do is name your form by simply typing the name into the ‘Form Title’ field. For example, we named our form ‘Newsletter Sign-Up.’
Next, go ahead and click the ‘Create Form’ button under the field.

Once you do that, the ‘Edit Form’ page will appear, and you can start customizing your HTML contact form.
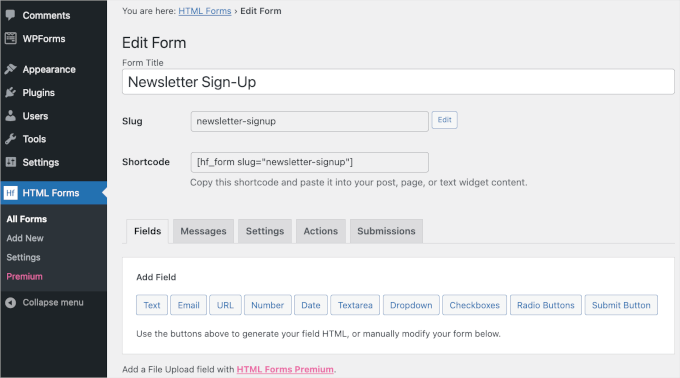
At the top of the tab, you’ll see your form’s details, including the form title, slug, and shortcode. You don’t have to memorize these details, as they will be available on the HTML Forms dashboard when you need them.
Below these details, you’ll find the menu tabs. In the ‘Fields’ tab, you can see various field buttons, like ‘Text,’ ‘Dates,’ ‘Checkboxes,’ and ‘Radio buttons,’ to add to your forms.

Let’s scroll down a bit more.
At the bottom of this tab, you’ll find a pre-built HTML form along with the preview. This contact form is pretty simple. It has four fields for users to type out their name, email address, a brief subject, and a message.
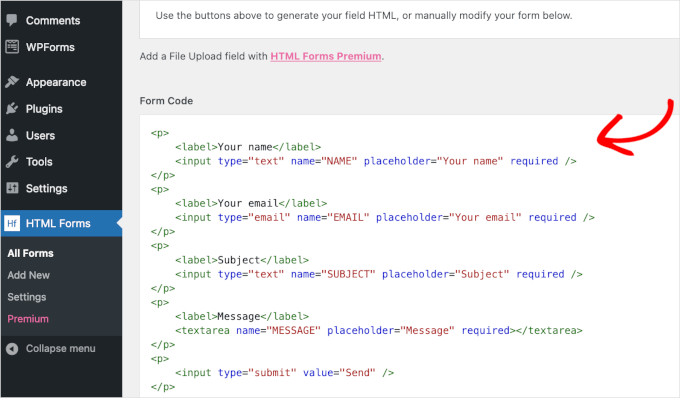

Now, let’s say that you want to add a new field with an email newsletter subscription sign-up. Then simply click on one of the field buttons above ‘Form Code.’
Note: Keep in mind that HTML Forms doesn’t support email marketing service integrations. So, you will need to manually add users’ email addresses to your mailing list.
For example, we will use a dropdown field and create a ‘Yes/No’ option.
From here, you’ll want to click ‘Dropdown,’ and this will open the dropdown field’s configuration options. You can start completing the details, which include the field’s label and choices.
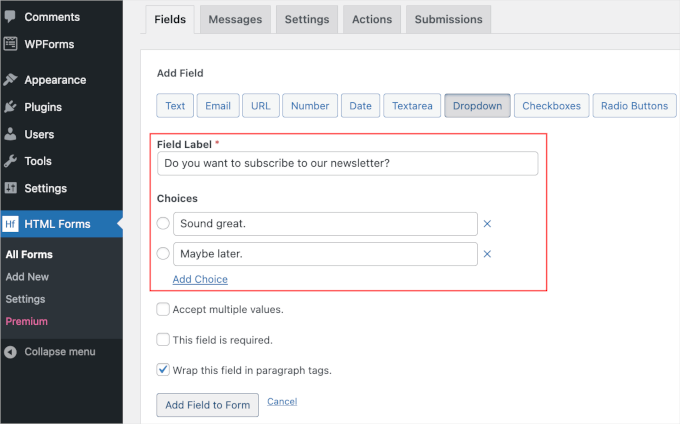

After entering the details, you can click ‘Add Field to Form.’
Then, you should see the dropdown field tag in the ‘Form Code’ section. Simply scroll down the tab to check it out.
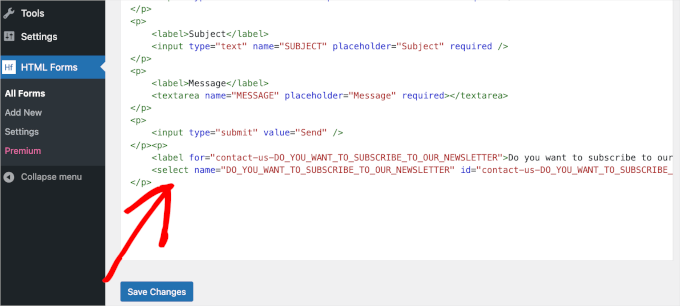

The next step is to reorganize the contact form.
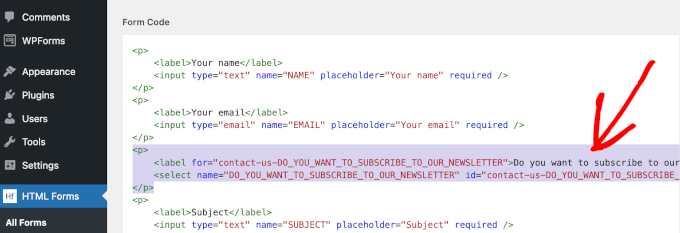
To maintain a good flow, you’ll want the dropdown field to be just below the ‘Email’ field.
To move it, you can cut the dropdown field tag from the first tag’s
to the last >. Then, go ahead and paste it just below the ‘Email’ tag.

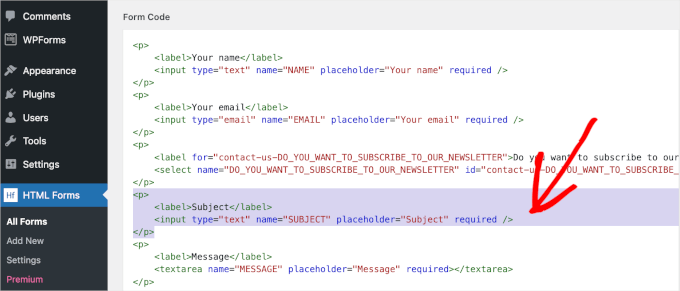
The default ‘Subject’ field might not be necessary for a newsletter sign-up form. So, we recommend removing the field.
You can do this by deleting its tag from the first
to the last
.

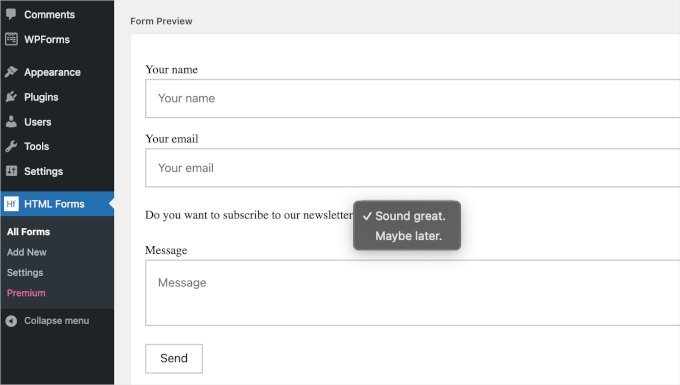
After moving and deleting tags, you’ll want to scroll down the tab to the ‘Form Preview’ section.
In this section, you can check if you’ve successfully moved and deleted the fields without breaking anything. You can also check if the dropdown menu works properly.

When you are happy with the results, go ahead and click the blue ‘Save Changes’ button under the ‘Form Code’ section.
Once the saving process is done, you should see a ‘Form updated.’ notification at the top of this page.
Now, you might want to check the form’s configuration. Let’s move to the ‘Messages’ tab to see how HTML Forms configures the form submission confirmation messages.
Simply click on ‘Messages’ to open the tab.
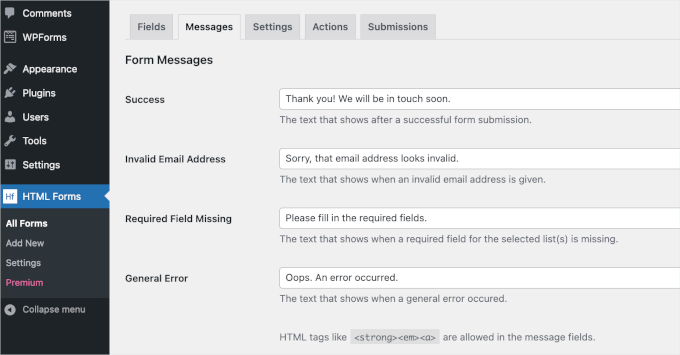

This tab allows you to edit the pre-made copy for when a user’s form submission is successful and other similar situations.
If everything looks good to you, then you can leave it as is. If you made any changes, don’t forget to the ‘Save Changes’ button so you don’t lose your progress.
Next, let’s go to the ‘Settings’ tab.
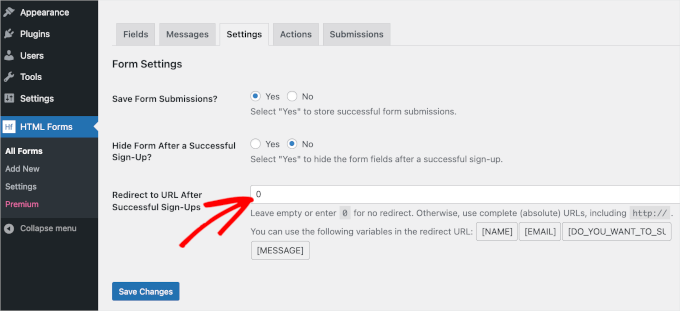

By default, HTML Forms will set ‘Yes’ to save each form submission and ‘No’ to hide the form after a successful submission. You can customize this as needed.
Then, in the ‘Redirect to URL After Successful Sign-Ups,’ you can copy and paste the URL of a live web page from your WordPress website. Or, type 0 into the field to keep users on the page after a successful form submission.
When everything is set, all that’s left to do is add the HTML contact form to a WordPress page.
Let’s head over to Posts or Page » All Posts or All Pages from the WordPress dashboard.
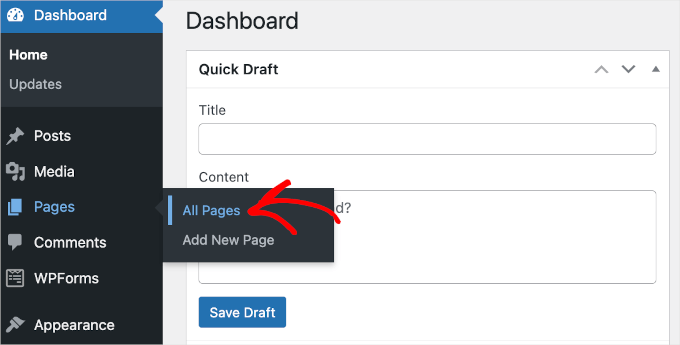

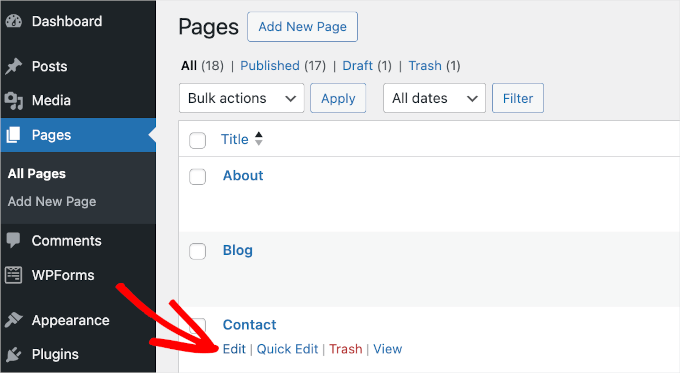
For this guide, we will add the HTML form to our ‘Contact’ page.
So, we’ll hover over the ‘Contact’ page in the list and click ‘Edit’ when it appears.

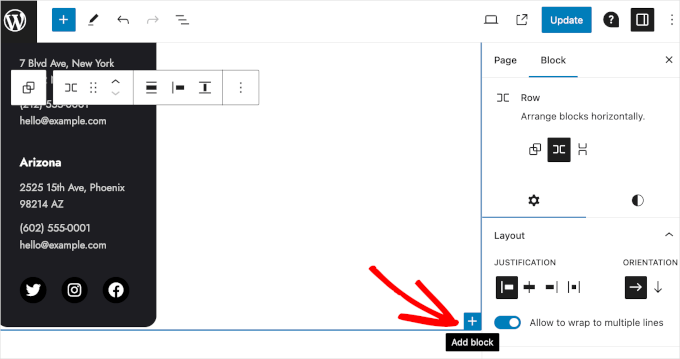
This will launch the ‘Contact’ page’s block editor.
In the editor, you can start choosing an area to place the form. Then, simply hover over it and click the ‘+’ button to add the HTML Forms block.

Now, you can type ‘HTML Forms’ into the search bar to quickly find the block. Once you have the search result, click it.
You’ll then see a dropdown in the ‘HTML Forms’ block. Simply expand on it and select the form you want to display. Here, we are picking the ‘Newsletter Sign-Up’ form that we just created.
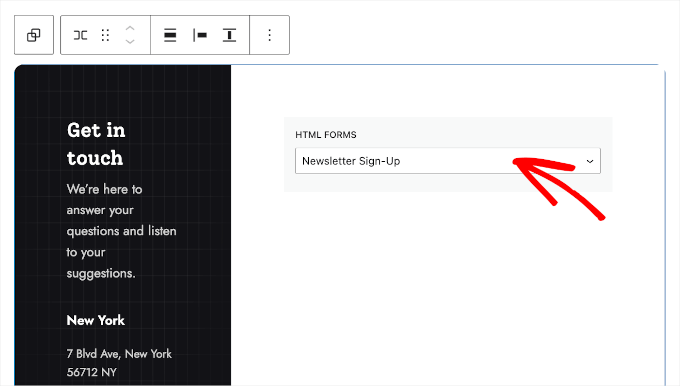

The form will appear when you publish your content. So once you’ve selected the form from the dropdown menu, you can click the ‘Update’ button.
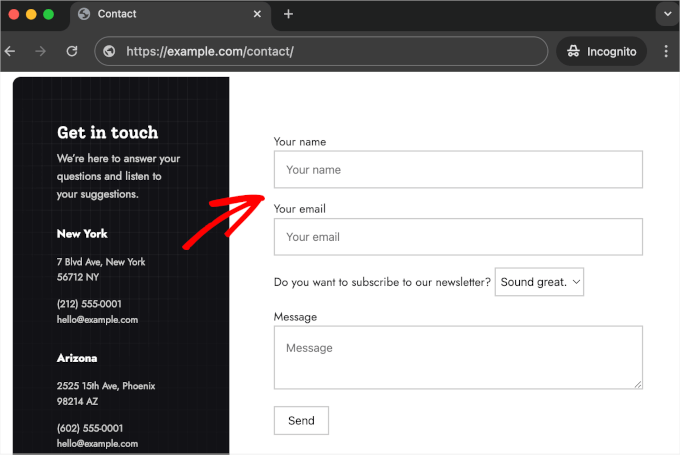
There you have it! Your form is now live, and users can sign up for your newsletter. Here’s what it might look like on your WordPress website:

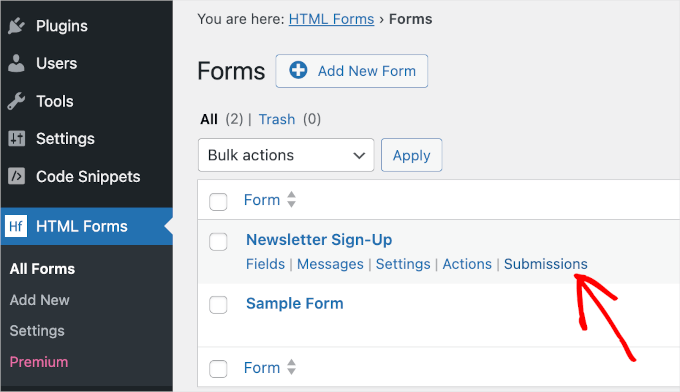
To see form submissions, you can first head over to HTML Forms » All Forms. This will take you to the list of all your HTML Forms.
Then, simply hover over a form and click the ‘Submissions’ button when it appears.

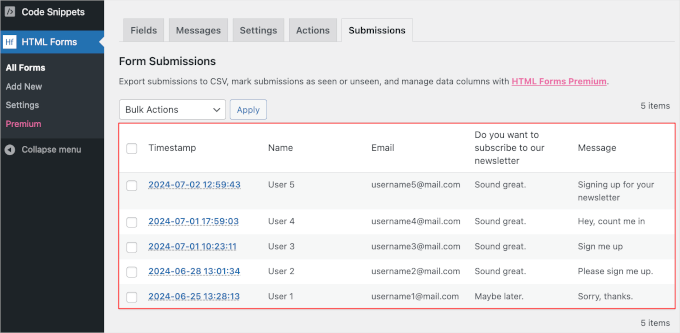
From here, you can see all of your form submissions.
The ‘Submissions’ table details all information users filled out in your form. Then, there’s the ‘Timestamp’ column, which tells you when they submitted the form.
For example, here, the first submission was made by ‘User 1.’
From the table, we can see that the user submitted the form on June 25 at around 1 p.m. Also, ‘User 1’ answered ‘Maybe Later’ for the ‘Do you want to subscribe to our newsletter’ question. So, in this case, you shouldn’t add their email address to your mailing list.

Method 2: Adding Custom HTML to WordPress Forms With WPForms
Another approach to creating HTML forms is using a form builder. While this method doesn’t let you code your forms from scratch, it allows you to customize them by adding HTML code snippets.
For example, you could use custom HTML to show a brief warning message on a checkout form with a link to your ‘Refund and Returns Policy’ page.
Or you can add a progress bar to let users know how far they are from completing the form. Custom HTML can even let you insert emojis or add a tooltip.
In this method, we will show you how to add HTML code snippets to customize your WordPress forms. We will show you how to do this using WPForms, as it is the best form builder for WordPress.
WPForms also comes with comprehensive one-click add-ons and third-party integrations.
These tools include Constant Contact for tracking your email marketing campaign, the Form Abandonment add-on for tracking and reducing form abandonment issues, and much more.
So, WPforms makes it easier to extend your form’s functionality than if you hard-coded your WordPress form from scratch.
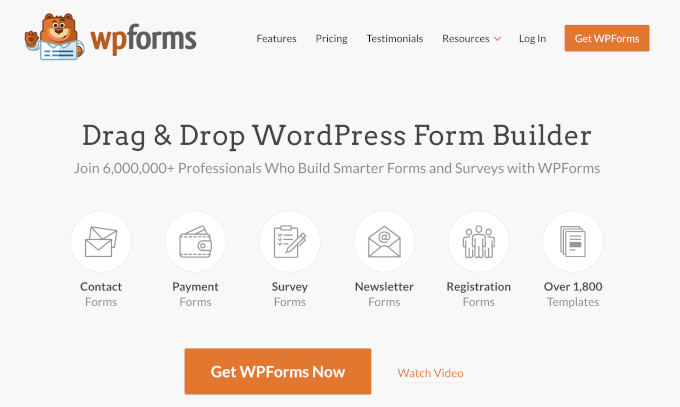

Note: WPForms Lite is completely free, but you’ll need the premium version to use the HTML field. Once upgraded, you’ll also get access to more than 1900 form templates, the conditional logic feature, and dedicated support. Luckily, as a WPBeginner reader, you can use our WPForms coupon to get 50% off.
Before we start, let’s make sure you have WPForms installed and activated on your WordPress website. If you need help, then please see our guide on how to install a WordPress plugin.
Upon activation, you can navigate to WPForms » Settings to enter your license code. After entering the key, simply click the ‘Verify Key’ button to start the verification.
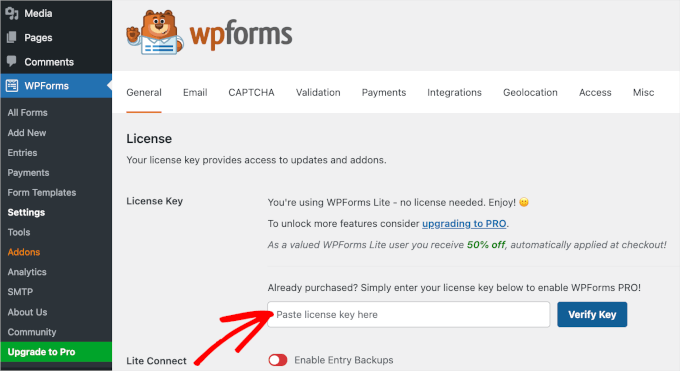

Once done, you can start creating your form and adding custom HTML. For this guide, we will show you how to add a simple tooltip to your contact form.
A tooltip is like a small pop-up box that appears when you hover your mouse over a web element. It’s handy as it lets users learn more about a specific web element without clicking or leaving the page they’re on.
But first, let’s create the contact form. Simply head over to WPForms » Add New from your WordPress admin area to get started.
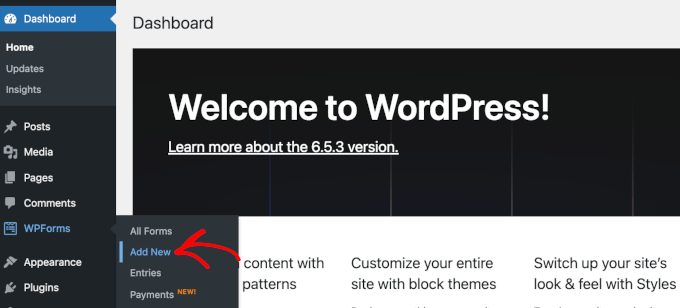

This will open the ‘Setup’ panel, where you’ll first need to name your form. This name is for your reference only, so you can use anything you want.
The next step is selecting a template.
As there are 1900+ form templates to choose from, you can use the search bar to filter them quickly. To do this, just type ‘Contact Form’ and wait for the search to complete.
If you want to explore each search result to see what the form is like, then you can take advantage of the preview feature. Simply hover over the form template and click ‘View Demo.’
Once you’ve found the perfect contact form for your needs, hover over it once again and click ‘Use Template.’
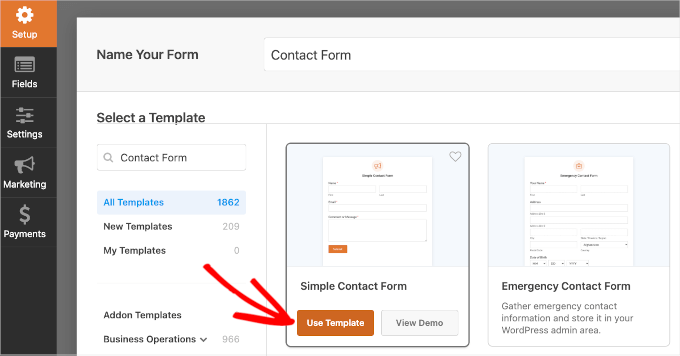

This will launch the form builder.
Now, all the customization tools are in the left panel, and the live preview of the form is on the right side of your screen.
On this whole page, you can use the drag-and-drop feature to add elements from the customization panel to the live preview. You can also use the feature to move around fields in the live preview.
Let’s try adding the HTML field to the form. All you have to do is scroll down the left-hand panel and then drag and drop ‘HTML’ onto the form.
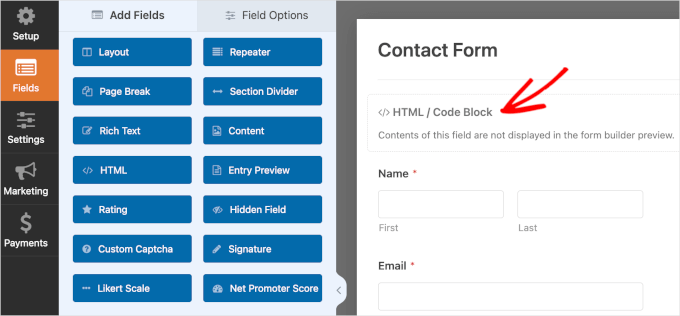

After inserting the HTML field, you can click on it to open its customization options. Here, the first thing to do is fill out the field’s ‘Label.’ You can also leave it empty.
Then, you’ll insert the custom HTML code into the ‘Code’ field.
To create a tooltip, you can use the ‘’ function or simply copy the following code and paste it into the ‘Code’ field:
Hi there! We have an email newsletter you might want to subscribe to. Let us know in the Comment or Message field, and we’ll sign you up.
This is just a sample code, so feel free to edit our copy to match your needs better.
Note: Keep in mind that if you want to directly add users to your mailing list, then you will need to integrate the form with an email marketing provider. To do this, just see our guide on how to use a contact form to grow your email list in WordPress.
Note that WPForms doesn’t display the HTML code in the form builder preview. To preview the field and make sure everything is right, you can save the changes first and click ‘Preview.’
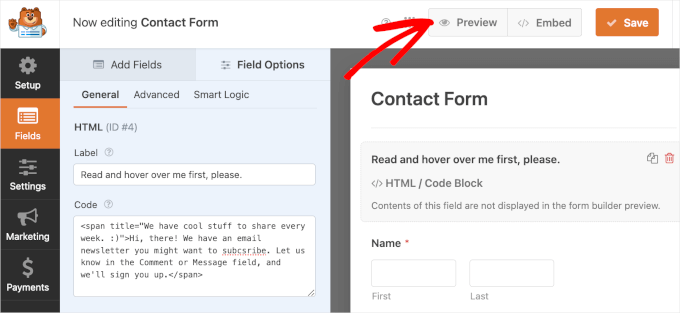

This will take you to a new tab.
Now, let’s test whether the HTML code snippet for your tooltip works properly. Simply hover over the text and wait for the tooltip to appear for a few seconds.
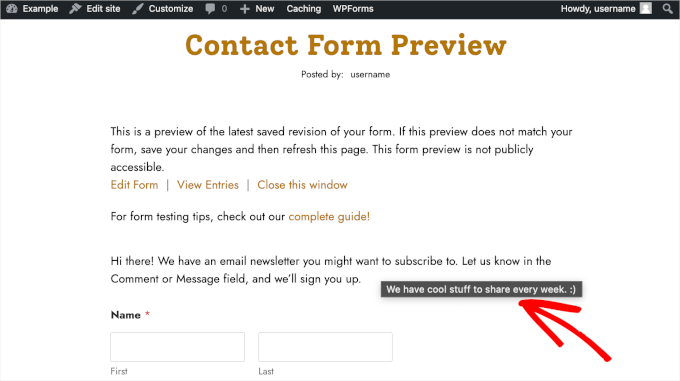

When you are satisfied with the result, you can go back to the form builder to finalize your form.
Your form notification and confirmation settings are already set up in WPForms. However, if you want to customize them, go to Settings, then Notifications or Confirmations.
In the ‘Notifications’ section, you can add multiple recipients for your contact form submission.
You’ll see a brief instruction if you hover over the question mark button next to the ‘Send to Email Address’ field. You’ll want to follow it to make sure your notification is sent to the right email addresses.
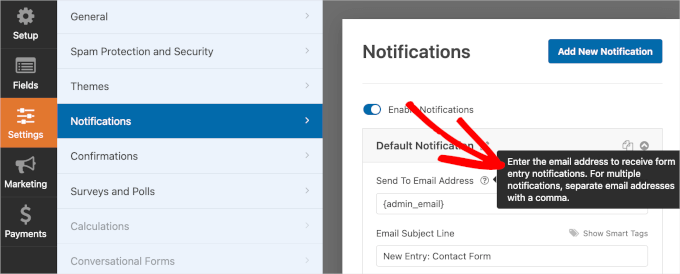

You can also edit the pre-made copy for your email subject line.
For example, we changed ours from ‘New Entry: Contact Form’ to ‘You’ve got mail: New contact.’
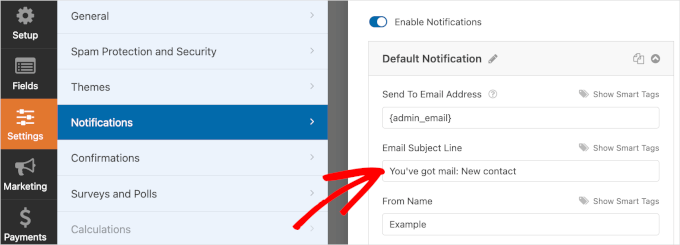

Once you’ve customized your notifications, you’ll want to move to the ‘Confirmation’ panel.
By default, WPForms sets your confirmation type to ‘Message’ and has the pre-made copy ready for you. You can definitely change these settings if you want to.
Other than showing a confirmation message, you can redirect users to a new page or a specific URL.
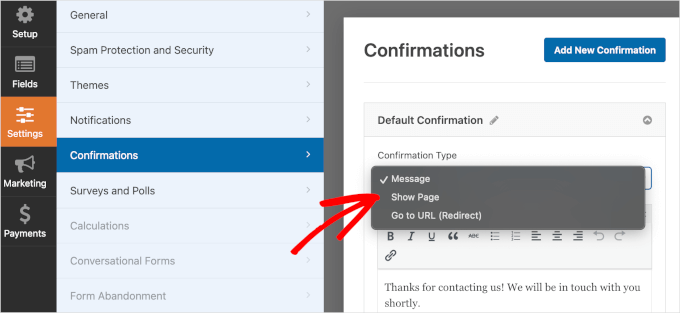

Once everything is set, it’s time to publish the form.
Go ahead and click the ‘Embed’ button to start publishing. WPForms will then ask if you want to add the form to an existing or a new page. In this guide, we will choose ‘Select existing page.’
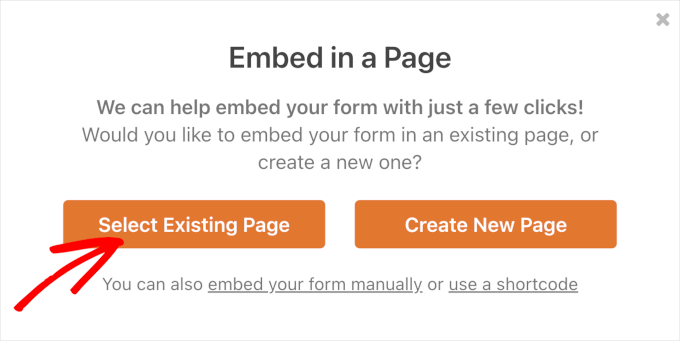

In the next pop-up window, you’ll choose a page from the list of available pages. After that, you can click ‘Let’s go!’ to go to the page’s block editor.
Now, you can hover over the area where you want to place the form and click the ‘+’ button. Go ahead and select the WPForms block.
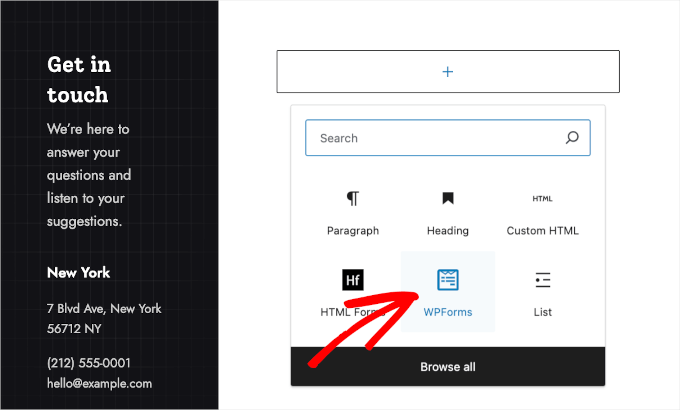

Then, you can choose a form from the WPForms block’s dropdown.
Once you’ve selected a form, WPForms will load it in the selected area. If you want to show the form’s title, then you can head over to the ‘Block’ tab in the right-hand panel and switch on the ‘Show Title’ slider.
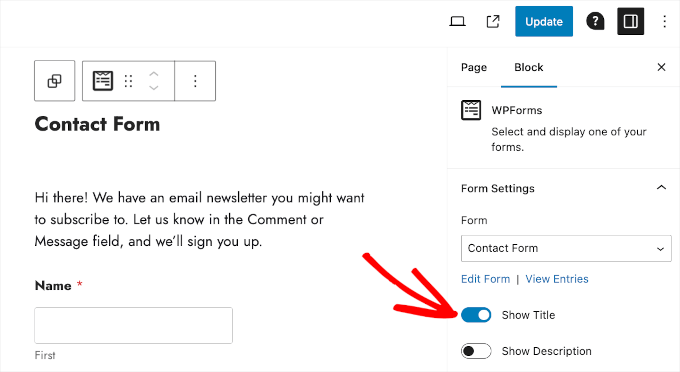

When you are happy with everything, go ahead and hit the ‘Update’ button.
And done! You’ve added custom HTML to your WPForms contact form and made it live on your WordPress website. Now, users can start filling out the form and possibly sign up for your email newsletter.
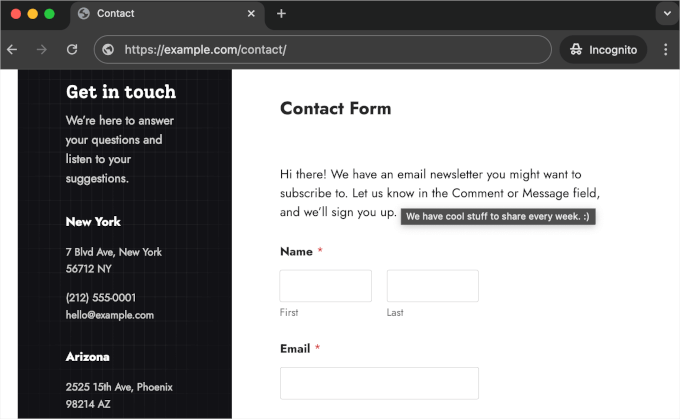

To see all your WPForms form submissions, you’ll want to navigate to WPForms All Forms.
Then, you can hover over ‘Contact Form’ or any form from the list and click ‘Entries’ when the button appears.
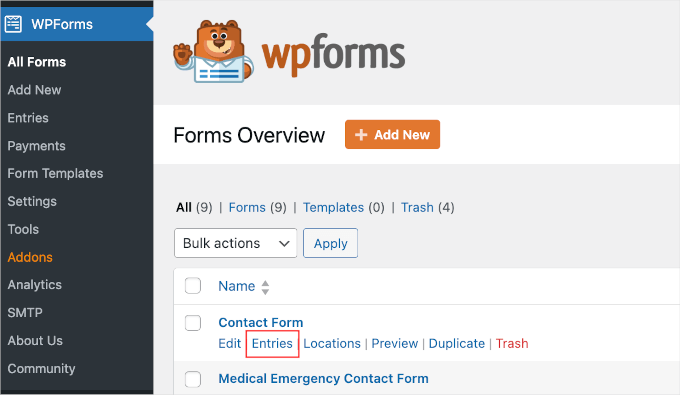

On the next screen, you should be able to see all of your form submissions.
The table details all the information users submitted with the form as well as the submission time.
For example, on July 2 at around 8 a.m., ‘User 3’ said they wanted to subscribe to the email newsletter and left a question on how to reach our customer support team.
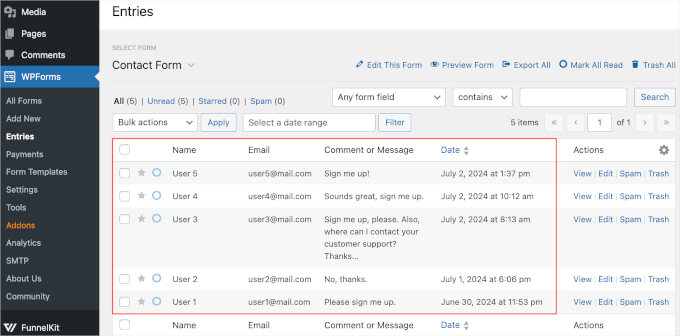

We can also see the ‘Actions’ column. In this column, there are several buttons: ‘View,’ ‘Edit, ‘Spam,’ and ‘Trash.’
If you click ‘View,’ WPForms will take you to an entry’s dedicated overview page. On this page, the plugin encourages you to activate two add-ons.
The first one is the Geolocation add-on for tracking, where the user submits the form. The second one is the User Journey add-on, which can help you analyze the user’s path through your site until they hit the ‘Submit’ button.
We recommend installing and activating these add-ons for more optimized form performance.
The ‘Spam’ and ‘Trash’ buttons are handy for marking fake submissions and removing them from your entry. To learn more about reducing fake form submissions, you can read our guide on how to block contact form spam.
Bonus Tip: Uploading a Custom HTML Page to WordPress
You might also be looking for a way to upload a custom HTML page to your WordPress site. This can be handy if you have a static template that you want to use or an HTML page from an old website.
The general rule of thumb is to upload a single HTML page with no separate CSS or image files. However, if the page you want to upload includes separate CSS files and images, then you must place them in a directory structure.
To learn more, you’ll want to see our beginner’s guide on how to upload an HTML page to WordPress without 404 errors.
We hope this article has helped you learn how to add HTML forms in WordPress. Next, you might want to check our other guides on how to export WordPress form entries to CSV and Excel and how to set up WordPress form tracking in Google Analytics.
If you liked this article, then please subscribe to our YouTube Channel for WordPress video tutorials. You can also find us on Twitter and Facebook.
Create your very own Auto Publish News/Blog Site and Earn Passive Income in Just 4 Easy Steps
