Creating recurring events on your WordPress site is a great way to save time and automate tasks. It helps you streamline your events so you don't have to create them repeatedly. With this approach, you can simply add an event once and have it repeat automatically at the desired date and time.
WordPress doesn't have a native feature for adding recurring events, so you'll need a calendar plugin to do this. Since there are many options, it can be difficult to find the best solution for your website.
That's why we tested and reviewed some of the most popular WordPress calendar plugins. Based on our findings, Sugar Calendar is the easiest solution. It is easy to use and offers powerful features.
In this article, we'll show you how to create and display recurring events in WordPress.

Why create and display recurring events in WordPress?
Whether you run a WordPress site for your local community center, church, gym, or other business, a streamlined way to plan and promote recurring events can significantly improve your operations.
This is because automating event scheduling and updates is more efficient. It can help you free up time for other tasks so you can grow your business.
Scheduling your events at regular intervals will also help you provide a better and more reliable experience for your guests.
For example, let's say that a play is performed in the theater every week. Creating a recurring event for this can help maintain consistency and ensure that this weekly event always runs smoothly.
Displaying recurring events also helps ensure a clear and organized events calendar, making it easier for visitors to find the information they need. You only need to create the event once and it will automatically repeat in the calendar.
On the other hand, promoting recurring events helps attract repeat visitors and build a loyal fan base. Additionally, by regularly marketing recurring events, you can build a consistent online presence across different platforms.
Now let's look at how to create recurring events on your WordPress site. Here are the steps we will go through in this guide:
Create an events calendar in WordPress
The easiest way to add a calendar to your website and create a recurring event in WordPress is to use Sugar Calendar.
It is the best calendar plugin for WordPress and super easy to use. It offers you plenty of customization options and allows you to create multiple calendars. The plugin can even sync with Google Calendar. To know more about its features, please read our full Sugar Calendar review.
For this tutorial, we'll be using the Sugar Calendar Pro version because it includes features for creating recurring events in WordPress.
note: There is also a free version of Sugar Calendar Lite that allows you to create one-off events and calendars.
First you need to install and activate the Sugar Calendar plugin. For more information, see our guide to installing a WordPress plugin.
After activation you can go to Calendar » Settings via the WordPress dashboard and enter your license key.
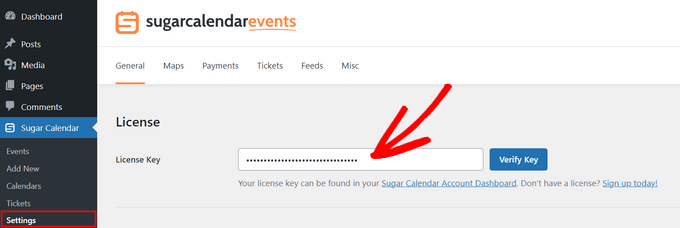

You can find the key in the Sugar Calendar account section. After entering the key, simply click on the “Verify Key” button.
Once this is done, you need to create a calendar for your website. Now Sugar Calendar adds a calendar by default, but you can add a new one if you want to keep your recurring events separate.
First go to Sugar Calendar » Calendar In the WordPress dashboard, click the “+Add Calendar” button.
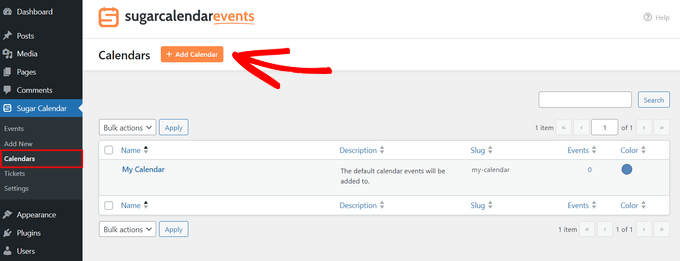

On the next screen you will need to enter details for your calendar.
You can start by adding a name at the top, changing the slug, adding a description, choosing a parent calendar, and choosing a color.
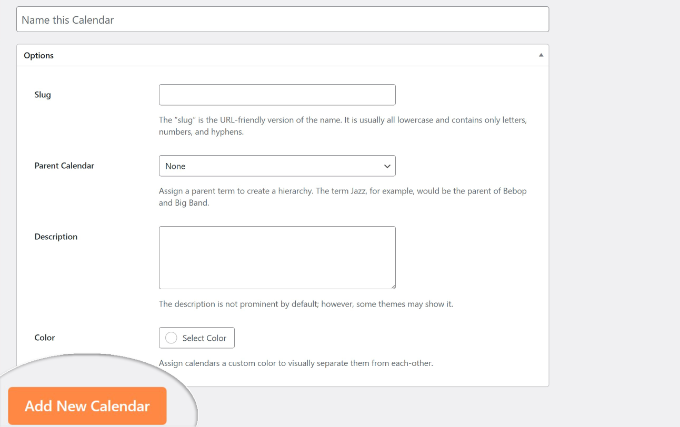

When you're done, just click the “Add New Calendar” button below.
Create a recurring event in WordPress
Now that your calendar is ready, the next step is to create a recurring event for your website.
Just go to the Sugar calendar » Events Page and click on the “+Add New Event” button.
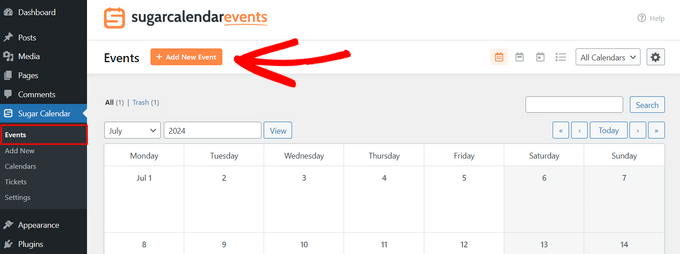

On the following screen, you can get started by entering an event name at the top. Next, under the Duration tab, you can enter details about your new event.
Here you need to set the start and end date and time for the event. Below there is also the option to enter the “details” of your recurring event.
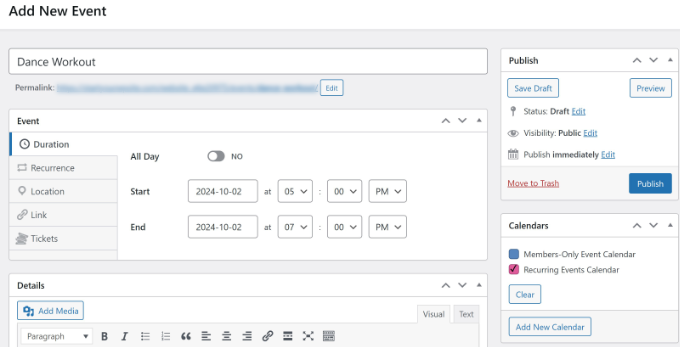

When you're ready, you can go to the Repeat tab. By default, the Repeat option is set to Never, but you can change this.
Simply click the Repeat drop-down menu and choose whether you want the event to repeat daily, weekly, monthly, or yearly. You can also specify how often the event should repeat, on which days and when it should end.
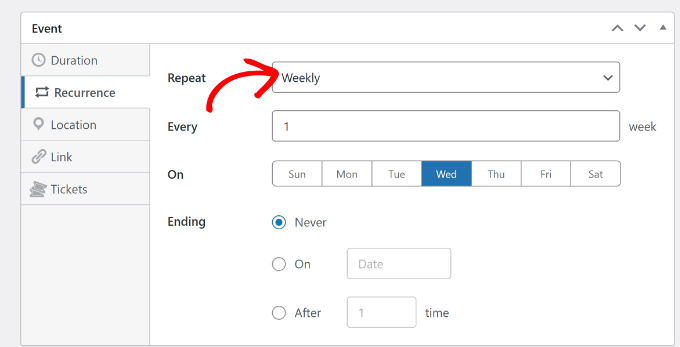

Additionally, you can add a location and link for your event. Sugar Calendar also lets you set up tickets for events that you can sell online.
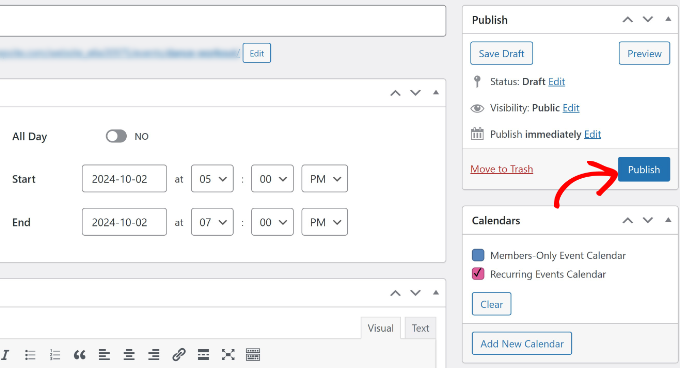
Once you have entered all the event details, you can select your preferred calendar in the right pane. Then simply click on the “Publish” button.

Next, you'll need to add the new recurring events calendar to a post or page on your site.
From your WordPress dashboard, you can edit or add a new post or page. In the content editor, click the “+” icon to add the “Event Calendar” block.
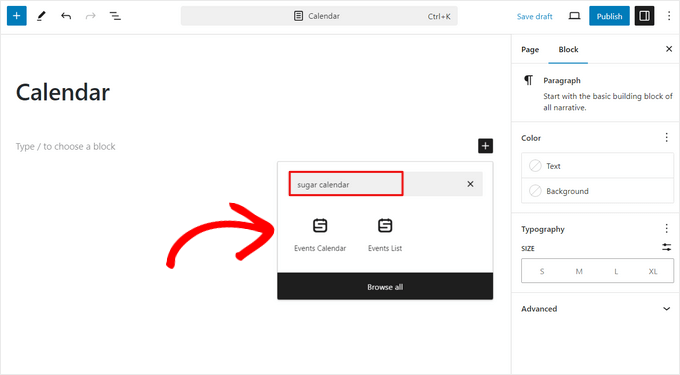

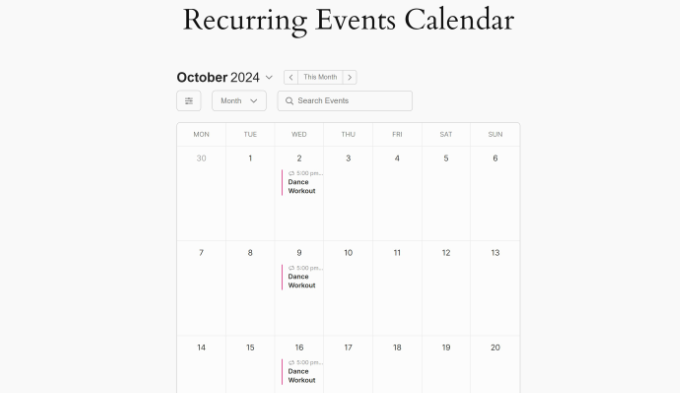
Your calendar should now appear in the content editor. You can check how it looks and then easily publish or update your page.
Visit your website now to see the recurring events calendar in action.

Bonus: Helpful guides on managing events in WordPress
Here are some additional resources for organizing and managing events and calendars on your WordPress site:
We hope this article helped you learn how to create and display a recurring event in WordPress. You may also want to read our guide to hosting a virtual event in WordPress and our expert picks for the best WordPress event ticketing plugins.
If you enjoyed this article, please subscribe to our YouTube channel for WordPress video tutorials. You can also find us on Twitter and Facebook.
Create your very own Auto Publish News/Blog Site and Earn Passive Income in Just 4 Easy Steps


